Before the lesson: (This is the same step from Part 1: Day and Night.)
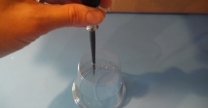
• Use the scissors to make a hole in the bottom of the plastic cup, near the side, as shown. It should be just large enough to accommodate the diameter of the straw.
• Make Earth orbit mats for each group. Draw a large circle on a piece of poster board. Place an X at four points evenly spaced around the circle. Label the points clockwise around the circle: March 21, June 21, Sept 21, and Dec. 21. This represents Earth’s orbit.


Engage:
1. Write the following question on the board or projector? What causes seasons?
2. Students think about the question, and then write their response on a post-it note and place it on the board.
3. Read the responses aloud and try to group them according to similar answers.
4. Leave the question and responses on the board for the class to review after completing the investigations.
Explore:
1. Explain that students will create a model to demonstrate how the Earth moves.
2. Give each group a plastic cup with a small hole punched in the bottom.
3. Students place a skewer inside the hole.

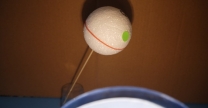
4. Tilt the skewer at an angle, and use a protractor to check the angle of the skewer’s tilt. It should be 23.5 degrees to model the Earth’s tilt.
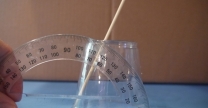
5. Lay out a 6-cm piece of tape and stick a 2-cm piece to its center (sticky sides together).
6. Use the modified tape to hold the straw against the side of the cup, yet still allowing the straw to rotate in the hole.
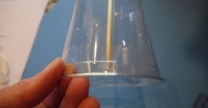
7. Place a rubber band around the center of the Styrofoam ball.
8. Press the ball onto the end of the skewer. It will show the same tilt as the skewer.
9. Place a sticky dot above the equator to represent where the student lives. Students may also use a Sharpie pen
to draw in features such as the North and South Poles.

10. Give each group a piece of poster board with Earth’s orbit drawn on it. This will be used as the Earth’s orbit mat.

11. Place the Earth model so that the Earth is above the June 21st X. Place the lamp in the center of the orbit so that is shining on the Earth. Ask:
- What season does the model show for the northern hemisphere? It is summer. The northern hemisphere is pointed directly at the Sun.
- How can we represent day and night using the model? Students can rotate the skewer clockwise to show the Earth moving from day to night. There are more hours of sunlight during the day in the summer than during the other seasons.

12. Explain that students will compare the distance the sticky dot is from the Sun at each location along the path. Ask students to measure the distance from the light (Sun) to the sticky dot at the summer position.
- Do you think the distance between the sticky dot in the northern hemisphere will be the same or different at each location along the path? Answers will vary. Students who understand that the Earth’s tilt does not change as the Earth revolves around the Sun may explain that the amount of direct sunlight reaching the northern hemisphere changes throughout the orbit. Some students will not recognize this until they take measurements at each position.
13. Students complete the Seasons Results page.
- What season comes next and which direction should the Earth move? Students should move the Earth counter clockwise around the mat to Sept. 21st. This is fall, or autumn.
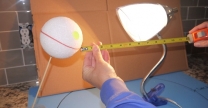
14. As students move the cup counter clockwise around the circle to Sept. 21st, they will notice that the tilt of the Earth does not change. (Students should not turn the cup as they move it, or the Earth’s tilt will change.) Make sure the Earth is above the X and the light is in the center of the orbit. Ask:
- What season does the model show for the Northern Hemisphere at Sept. 21st? It is fall. The northern hemisphere is not pointed away or towards the Sun.
- Does s rotation affect the tilt? No. Students can model this to show that the tilt does not change.
15. Students measure the distance from the light (Sun) to the sticky dot in the fall position.
16. Students complete the Seasons Results page.
- What season comes next? Students should move the Earth to Dec. 21st.
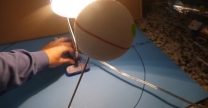
17. Students move the cup counter clockwise to Dec. 21st. Make sure the Earth is above the X and the light is in the center of the orbit. This represents winter for the Northern Hemisphere. Ask:
- How can you tell that it is winter in the northern hemisphere? The northern hemisphere is pointed away from the Sun.
- What happens when the Earth rotates at this position? Day and night occur, but the season does not change. The Sun’s rays strike the Earth at a lower angle, which reduces its effectiveness at heating the ground. There are fewer daylight hours during the winter in the northern hemisphere than during other seasons of the year.
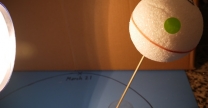
18. Students measure the distance from the light (Sun) to the sticky dot in the winter position.
19. Students complete the Seasons Results page.
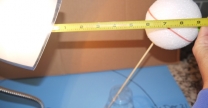
20. Students move the cup counter clockwise around the mat to March 21st. Make sure the Earth is above the X and the light is in the center of the orbit. Ask:
- What season in the northern hemisphere does the model show? Spring. The northern hemisphere is not pointed away or towards the Sun.
21. Students measure the distance from the light (Sun) to the sticky dot in the fall position.
22. Students complete the Seasons Results page.
Explain:
1. Use the following website to show the relationship between the tilt and revolution of the Earth and the Sun’s light.
2. Use the following resources as additional examples of the Earth and Sun.
3. Ask and discuss:
- What do we call one complete path of the Earth around the Sun? One complete path is one revolution around the Sun.
- How long does it take the Earth to make one revolution around the Earth? Since each season is represented on the orbit, it takes one year, or 365 days to complete one revolution around the Sun.
- How is the Earth’s tilt important? Many people think the seasons are caused by variations in our distance from the sun. While the earth’s orbit is slightly elliptical, it is very close to circular. The distance between the Earth and Sun throughout Earth’s orbit is not enough to account for our seasons. As demonstrated in the model, Earth’s tilt is fixed in space as it moves around the sun. The tilt determines how much direct sunlight each hemisphere receives, and is the cause of the seasons.
- What would happen if the Earth were not tilted? Students may have different suggestions. Some may say that there would not be different seasons since the amount of sun reaching each hemisphere would not change during the year.
- What happens in the southern hemisphere during each season? The southern hemisphere experiences the opposite season as the northern hemisphere.
Elaborate:
1. Explain that students will investigate the difference in temperatures with varying angles of light.
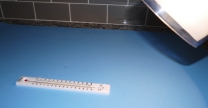
2. Give each group of students a thermometer and a lamp with a flexible neck. Set the lamp and thermometer on a table so that the light shines at a 90° angle onto the thermometer.
- Record the starting temperature on the thermometer on the Season Results page.
- Record the temperature at 5 and 10 minute intervals.
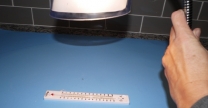
3. Set the lamp at a 45° angle. Make sure the distance between the lamp and thermometer is the same at both angles. Wait 5 and 10 minutes. Record the thermometer’s temperature at each interval. Ask:
- What was the difference in temperatures? As students may have predicted, the thermometer measuring light at a 90° angle became hotter faster than the thermometer measuring light at 45°.
- How is this model like the Sun and Earth? During the winter season, the Sun’s light is indirect, so temperatures are cooler in the northern hemisphere. During the summer months, the Sun’s light is more direct, causing warmer temperatures.
Evaluate:
1. Students complete the Seasons Results page.
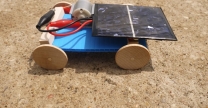
2. Now that students see how the angle of sunlight hitting the Earth can affect temperatures during different seasons, students will explore direct and indirect light further using solar cars. Introduce the engineering challenge:
Design and build a car that uses solar energy to travel as far or long as possible.
3. Students work in groups to build a solar car. Students set the solar cell at a 45 degree angle.
4. Go outside to see how far the solar cars can travel. Students place the cars on a flat surface such as a parking lot or sidewalk. If possible set up a 10-20 meter track depending on space available.
5. Students record the distance and time the car travels on their results page. Students conduct three tests with the solar panel at this angle.
6. If the cars do not start moving, students should check the connections of the leads. Ask:
- How well did the car travel? Answers will vary. Cars may not travel the same on cloudy and sunny days.
- Do you think changing the angle of the solar cell will affect the results? Students may suggest laying the panel at different angles.
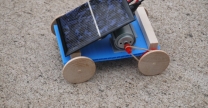
7. Next students place the panel at a 90° angle and test the car again. Conduct three tests.
- How did this angle compare to the 45° angle? Answers will vary.
- How do direct and indirect light affect how well the car travels? Students will notice that direct light will provide more energy to the car. The light conditions on the day of testing will affect the outcome. Students will notice that direct light is determined by the angle of the sun’s light. If the sun is lower in the sky students will need to angle their panels. If the sun is high in the sky, students will need to lay their panels at less of an angle. Try testing the cars in the morning, in the afternoon, on sunny days, and on cloudy days.
8. Allow time for students to test the solar panel at varying angles to compare results.
9. Review the question students answered at the beginning of the lesson: What causes seasons?
- Read the responses aloud. Ask students to explain what makes some of the responses incorrect. Students may work in groups to explain one of the responses.
- Students may use their Earth and Sun models to demonstrate how the Earth’s tilt causes seasons.
