Experiment Category:
Objective:
What You Need:
- At least one 8 1/2 by 11 inch sheet of paper.
- Optional targets - these can be cones, other sheets of paper, Xs taped to the floor, or anything else at which you can aim a paper airplane.
To Do and Observe:
1. Follow the folding instructions for the Navy Jet, from John Bringhurst’s book "Planes, Jets and Helicopters: Great Paper Airplanes".
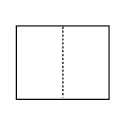
Step 1: With the 11-inch side of the paper at the bottom, make a central crease by aligning the left edge of the paper against the right. Crease well. Unfold. Turn the paper over.
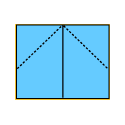
Step 2: Fold down both top corners, aligning the top edge of each side with the central crease. The top of your paper will look like a triangle.
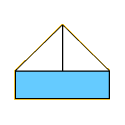
Step 3: Fold down the top tip, so that the tip rests exactly on the center where the horizontal paper edges meet (as shown in fig. 4). Crease well.
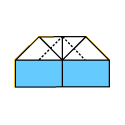
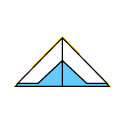
Step 4: Now, fold down the top corners as shown, again aligning the top edge against the central crease.
Step 5: This is the result of Step 4. Turn the plane over.
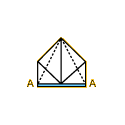
Step 6: Fold each wing tip toward the center so that they exactly touch the central crease in the back. Keep the back of the wing perfectly aligned. The result should look like fig. 7.
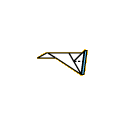
Step 7: Make a diagonal fold as shown from the front tip of the plane to Point A on each side, to form the front edge of the wings. Crease very well.
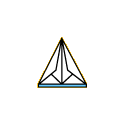
Step 8: Shows the result of step 7. Now fold the plane in half along the central crease.
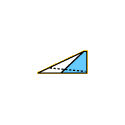
Step 9: Fold down each wing as shown. The fold should start a little over an inch from the front of ht plane, and should taper toward the central fold in the back, as in the illustration. The wings should be aligned perfectly with each other - the exact location of the fold is less important than making it the same on each side.
Step 10: This drawing shows the plane from the side, with the wing folded down. On each side, fold out the tail as shown, making the fold approximately parallel to the wing fold from Step 9. This fold should be as equal as possible on each side.
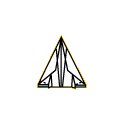
Step 11: This is a top view. Gently bend up the outer tip of each wing as shown, to make an elevator on each side.
2. Try a few practice tosses to see how well your plane flies. Make adjustments to the wings and elevators to make it fly straight. Hint: the wings and folds should match on both sides. If you sight from behind the plane, you can see how symmetrical it is.
3. Now, bend the right wing up slightly, where the wing connects with the body of the plane. Toss your plane again, what happens?
4. Fix the right wing and bend the left wing up slightly, where the wing connects with the body of the plane. Toss your plane. What happens?
5. Fix the left wing and try bending the elevators up and down. What happens when you toss the plane? Can you make your plane do a loop de loop?
6. Try a combination of adjustments to the wings and elevators - what happens when you toss the plane?
7. Try crumpling the nose and toss your plane again - what happens? This one is hard to undo, so you might want to save it for last if you don’t want to fold another plane.
8. Optional - set up targets (one to the left, one to the right, etc.) and see if you can hit them by changing the elevator and wing combinations.
What's Going On:
It's important to realize the basics of why paper airplanes fly, and why full size airplanes fly, are identical. They create lift and drag, and are stable or unstable for the same reasons.
Lift: Air molecules travel farther over the long top of the wing. Since the air molecules on the top surface of the wing have to go farther in the same amount of time, they are moving faster than the air molecules on the lower wing surface. When the molecules move faster over a greater distance, they are more spread out (less dense). When molecules move, they put pressure on whatever they strike. The more molecules that strike the object, the more pressure or force there is on the object. Because there are more air molecules per inch along the bottom of the wing, the pressure of the molecules hitting the bottom of the wing is greater than the pressure from the less dense layer of molecules on the top surface of the wing. This pressure difference causes the wing to be pushed or lifted upward.
Drag: Drag can be considered resistance, or the friction acting on an object moving through air. To reduce drag, you want the surface area of the side of the object that "hits" the air to be as small as possible so the air can flow smoothly around it. Elevators take advantage of drag to help steer the plane. The horizontal tails on full size planes have an elevator that the pilot rotates up to make the plane nose up and fly slower, or down to nose the plane down and speed up. Paper airplanes accomplish the same thing by bending the back edge of the wing up to fly slower, or down to fly faster.
Steering: Changing the angle of the wings (bending them up or down) changes the "dihedral" of the plane. Basically, bending the left wing up veers the plane to the right because the imbalance between the wings alters the lift (way the air molecules flow around the wings), and ends up putting more pressure on the right wing, pushing the plane off to the right. It's similar to how a rudder in a boat works.
Parent/Teacher Tips:
Be sure to toss the plane evenly, with one good straight push - like you’re throwing a dart, not a baseball. If you’re still having trouble, make sure the wings are bent up slightly, but evenly, from where they’re connected to the body of the plane (this increases the lift your plane will get and help it soar).
Ever wonder why paper airplanes don’t have a tail? The horizontal tail of a plane allows the weight to move forward and aft more while remaining stable and controllable. Where a plane balances if it were supported at only one point is called the Center of Gravity (CG). The CG can move further forward or aft due to different passenger and cargo loadings, and due to fuel burn (most jets carry about half their empty weight in fuel). All airplanes become unstable if the CG moves aft of a point called the Neutral Point. As the CG moves forward of the neutral point, the plane gets progressively more stable, and progressively needs more up elevator. Elevators on tails can be more effective than elevators on the back of wings, so planes with tails can have a greater CG range than planes without tails. With paper airplanes their CG does not move, so they are fine without a tail.
Encourage your child to fold their own airplane design and see if the same principles apply.
The paper airplane instructions and renderings are from Planes, Jets & Helicopters: Great Paper Airplanes by John Bringhurst (Copyright 2003 McGraw-Hill Companies, Inc.)
